NOTE: Okay, I fess up that shameless nod to one of my favourite bands of the 80’s the indomitable “Echo and The Bunnymen” and their ‘hit’ “The Cutter”. What can I say I spent the later part of the 80s dressed in black moaning about how terrible life was… But hey, didn’t we all do that as teenagers?
This blogpost represents a walk thru the Droplet Computing container application and will attempt to describe the technology whilst keeping eyes focused on the practical side of life. I think I have one more Droplet Computing blogpost in me, and that post will be about where I think the next iteration of features should take them, and some of the challenges around achieving that. There are plenty of other things I want to learn about Droplet Computing, not least the process of authoring .droplet image files. So, whilst this blog does cover some very modest “administrator” like functions, it’s still very much focused on the “user experience” rather getting into much of the weeds of management.
Being a Mac user, I was supplied with the OS X version of Droplet – but a Windows and Linux version exists. The main thing to say is the functionality is the same regardless of device type, and the image file that makes up the environment in which applications work is portable between three support device types. Remember, Droplet Computing is container-based technology, it’s not a virtual machine or application virtualization. Apps are installed “as is” without any special packaging or sequencing process. And I think this will appeal to customers who do not have the time or resources for a dedicated team of packaging experts.
In the Apple Mac system images are moved from the location from which they were downloaded to this path:
/Users/<username>/Library/Application Support/Droplet/Images

These .droplet image files basically holds the Container OS files, I’m my case Windows XP together with any applications that have been pre-installed there. Droplet Computing provided me with the .zip file that contain both the core application and the image. When starting Droplet Computing for the first time you’re asked for the .droplet file, and if required it will move it to the images path. Currently, it’s Droplet Computing that provide the base .droplet file from which you can make multiple copies, and install software using the usual methods.
[Technical Bit: Early versions of Droplet Computing used a web-browser such as Google Chrome to provide the runtime environment. This approach has been dropped for the moment, as Google were pushing too many updates to Chrome to make this a reliable process that didn’t trigger endless regression testing. Droplet Computing has adopted a Chromium web-browser which they control to side step this issue. Needless to say, that the end-user never sees this hidden web-browser.]
Start and Load a Droplet Computing Container/Application
When Droplet Computing is loaded for the first time, the user has access to locate their image file, and there’s an option to control how much memory is assigned to the container, as well as set the location of their “Shared Folder”. This allows for the easy transfer of small files to and from the host and the Droplet Computing Container. Personally, I didn’t use this shared folder feature – opting instead to connect the Container OS to my home NAS server, and find my software there.

I’ve an old 13” MacBook Pro with 8GB of RAM and SSD drive which is circa 2012. So, it’s by no means a powerful machine by modern standards (it suits my needs perfectly fine until it stops working!). Clicking the big orange “Start Container” erm, starts the container…. That process took on my machine about 1min and 30seconds which I don’t think is too shabby considering the hardware involved, and the start-up time compares very favourably to a locally run virtual machine using VMware Fusion or Virtualbox.

To make my life easier, Droplet Computing has pre-set-up an application as part of my sample image that was notepad. A simple “launch” button option loads the application from within the container.


Shutting down an application is the same in the container as it would be in Windows XP. Clicking the red X in the top right-hand corner will close the app or using File, Exit. It’s the container OS’s job to check that files have been saved, and if the users chose to save some data, then it currently defaults to the user profile settings. In the world of a generic unmodified Windows XP installation, this is the “My Documents” folder. (Gee, remember when every folder in a Windows install had the word My appended to it for no apparent useful reason!). One thing that’s worth noting is that currently it is possible to shut down the container and the OS container, with open and unsaved files in the application using the power button. This does not suspend the Container OS, and when you start the container again, that data will be lost.

The Edit options allow you to view/change the applications configuration parameters, and these amount to simple variables such as name, .exe path, and description. Currently, there isn’t a browse option to locate the .exe, you have to type the path manually. Incidentally, this sort of browse functionally looks easier on paper than it is to implement in practice especially if you want to make sure the Container remains a secure environment.

You can upload an icon to act as friendly logo, this currently means browsing for .png, .jpeg, and .jpg files. This browsing is from within the Host OS, not the Container OS. So, I took a screen grab of the TextEdit application from the Apple Mac. I think in future Droplet Computing will inspect the .EXE and present icons from with it.
What can I say I like pretty icons!
Adding a New Application
The Droplet Computing Container is password protected, and adding a new application requires the administrator password. Droplet Computing sets a default password for both access to the Container. The important thing to say is this a password for Droplet Computing. It’s not the password for the Container OS admin account, nor is it the password for the local device. So this password sits independently of those and is designed to secure the access to the Droplet configuration such as adding/removing tiles, and opening up the ContainerOS to install new software.
Remember, Droplet Computing passed recent PEN Testing with flying colours, and so I don’t imagine this is an issue.

Once validated the container unlocks the options to add more applications for the user, revealing a + application tile from where you can add the parameters.


There’s currently no “browse” option here to navigate into the container, nor does Droplet Computing validate these paths to make sure they are correct. I knew that a legacy version of Microsoft Office 2010 had been pre-installed to the Container OS, so the way I validated the path was by doing the following:
I asked Droplet Computing to “Show Container”

Which reveals the administrator-only “spanner” icon, that allowed me to run Windows Explorer to check the path to winword.exe
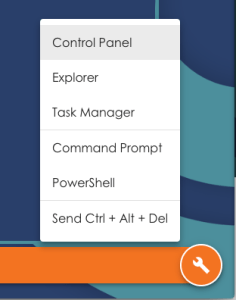
Once I’d found the install directory, I was able to make a note of the path (without speech marks incidentally) and the .exe.
As you can see in the screengrab above, this administrator mode exposes aspects of the Container OS shell in the form of the Control Panel, Explorer, Task Manager, Command Prompt, PowerShell (if installed) and sending the Ctrl-Alt-Del keystroke to the Container OS.
When my work was done, I could see both Notepad and Microsoft Word.

There’s currently no method of copying a tile, to be able setup a new application by quickly modifying the path to the .EXE and the icon file. That said, this is a one-off operation that doesn’t take that long to configure. I notice there’s no way to drag tiles around, and they are sorted by application “name” field. So used a naming convention of Microsoft Word 2010, Microsoft Excel 2010 and so on to make sure they were grouped together.

Once multiple applications are available to the user they can switch back to the list of tiles, using the “Show Apps” option. This appears once the 1st application is loaded in my case, Microsoft Excel 2010

They can then load another application such as Microsoft Word 2010. The task bar shows the applications that currently open like so:

Installing new software to the Container OS
Adding new software to the Container OS involves a couple of steps:
- From host locate the source software
- Place on shared location in such as NAS Server
- Download and Run installer within the Container OS
As example of doing this for Windows XP I used PuTTY. By far the easiest thing to do is to put the .exe or .MSI on a NAS server, and then map a network drive from the Container OS to the NAS Device. I did this by entering the administrative mode, and then running a Command Prompt
From there I was able to carry out a net view on the IP address of NAS server to see the shares on it:

And then a net use command to map a network drive:

From there I could use the copy command to copy the PuTTY.exe file to C:\Program Files. Once that was done, I was able to add PuTTY as tile to main view.

This work does beg the question on how networking is arranged inside the Container OS. In my case the Windows XP instance has a DHCP address from an internally supported IP range. So, it did not get an IP address from my home router. DNS and Routing queries get sent to an internal service which then piggy backs off the host networking. This allows for outbound access to my network, and the internet – but with no corresponding inbound access. This was just-enough networking to get me to my NAS server. As an aside, I notice Internet Explorer was not installed in my Windows XP image.
Conclusions:
From what I can see Droplet Computing has put together a robust release 1.0 product with PLENTY of scope for future features and functionality. They have developed their own in-house approach that solves the issue in a unique way. Personally, I think that’s no small achievement. It’s perhaps worth restating what those issue entail. As with server virtualization there’s always been that challenge of extending the lifetime of a legacy application beyond the life of the hardware and operating system for which it was first designed. Other attempts have been made using server-based computing (Citrix/MSFT-TS) and virtual desktop infrastructure (Horizon View and others). But these are have been datacenter focused solutions. I’ve championed both of these approaches in the past, and continued to do so – with the caveat that they place user-workloads in the most expensive computing space known to the Enterprise. So whilst VDI and SBS remain useful tools in a companies armoury, we have to acknowledge that much vaunted “death of the PC” and “Year of VDI” hasn’t happened. The PC remains the resilient and cost effective method of delivering a compute experience that hasn’t been eclipsed by the tablet or the dumb-terminal (I prefer to call them smart terminals, personally)
The bonding of hardware, operating system and an application has been ‘loosened’ in the last couple of decades. But they are still close coupled together. It’s only really containers on the server-side with technologies like Docker and Kubernetes that has really been a significant challenge and change in the way applications are developed. I think the time is right for that “container” approach to applied to desktops as well. Creating a mirror image of what’s happening in the space of server-side application or new paradigm for how companies might deliver applications in the future. The issue of legacy application support isn’t going away, because it has gone away for the last two decades (and a bit more) that I’ve been in the industry. So as companies see operating systems like WindowXP and Windows7 fall off the support cliff, I suspect that the same situation will be faced with Windows8/10. And there’s more. If I thought technologies like Droplet Computing were just about legacy applications, I’d be less excited by this space. The fact is I think many companies once they harness the power of container technology for legacy applications, will be thinking about using at as method of deploying new applications.