Introduction:
So far my previous two posts have focused on setting up the vCloud Connector 2.0. That’s great, but only really takes the story so far. The bigger question is what can you do with thing… remember that? Yeah, I know I sometimes do that. I get so focused on setting things up and making them work, that I lose site of the end-game. The how you would use it side of things. I’m going to avoid the really obvious stuff like powering on VMs, navigating, searching and viewing properties…
If your working in a homelab and/or have limited upload bandwidth (4GB VMDK into ADSL do not go!) then you might want to look at my recent blogpost about using teeny-weeny-tiny-whiney distributions of Linux to get a functional ssh/ftp/http service going for testing purposes. Of course if you have 1Gps uplink to the Internet backbone, then you needn’t worry.
Reloading a Cloud Provider:
Firstly, one thing you might need to is refresh the information in vCC – although there is a refresh option near you login details – that doesn’t always update the information, so occasionally I’ve seen the vCC refer to objects (Templates, vApps and VMs) which I know I have recently deleted in my vCloud layer. To force a refresh right-click the cloud and chose reload:

This is normal behaviour in vCC due to the RESTful API’s works. Updates are not asynchronous so sometimes the reload button is needed.
Deploying vApp Templates from the Cloud
You can do a lot of the stuff in vCloud Connector that you could do within vCloud Director. For example whether you have a public or private cloud listed, if there is a vApp Template in a catalog you should be able to deploy it.
1. Browse Da Cloud (do you like that?) Select the Catalog, and the “Templates” Tab. Select the Template, and whack the Deploy icon

2. Select which Organizational Virtual Datacenter you want to deploy to – and which network it will reside on.

Note: This defaults to Fenced vApp connection to the OrgNetwork – so the vApp comes up with the same IPs I had behind a vCNS Edge Gateway. Incidentally, if you are in Stratogen’s Cloud you won’t see “CorpHQ – Production Virtual Datacenter”. That’s actually a cheat by me – as an attempt to map the wizard to stuff you might see in a Private Cloud – and mainly I don’t want you to see my actual Organization name in the Stratogen Cloud.
3. Decide if will be powered on at creation…

4. Follow the progress in the “All Tasks” pane.

Copy VMs, vApps and Templates between Clouds
vCC supports the copying of VMs, vApp and Templates in MANY directions. One of the slight confusing aspects of the official documentation is the reference to “vSphere Cloud”. What’s really meant by this is being able to copy from vSphere to vSphere/vCloud. That said because of the multiple direction that this copy process can take (vSphere to vSphere, vSphere to Cloud, vCloud to vSphere, vCloud to vCloud) its sometimes tricky to account for all the object types and what they become when they leave one type (vSphere) to another (vCloud) – actually the official documentation is pretty good. The reality is what matters isn’t so much if they direction is public to private so much but when the object is being taken from its “native” location to a new environment – virtualization to cloud, and cloud to virtualization…
Three main things to remember:
- You cannot copy a powered on VM with a cloud, you must power it off before the copy, and you need writable catalog on the destination vCloud
- The important thing to remember is ALL copies of any type to vCloud Director – result in a vApp Template being created
- Therefore the destination vCloud must have a catalog available to you to complete the copy process. For example Stratogen have a public (read-only) catalog that contains some sample vApp – but they don’t create a “default catalog” – so I created one…
Copy from vSphere:
So in all copies from vSphere to the vCloud the object becomes a vApp Template in vCloud Director – whether it is vSphere VM, vApp or template. If you are copying from one vSphere to another then all the objects properties are maintained.
1. Select the “Cloud” in my case “Corp Private vSphere” and navigate to the Virtual Machine Tab – select the VM, and from the Action pull-down list select “Copy“

2. Select a Cloud and a Catalog to copy to:

3. From the pull-down list select the Organization Virtual Datacenter where the vApp Template will reside

4. The Deployment options – allow you just to copy the VM as vApp Template in the destination catalog – or optionally deploy after it has arrived at the destination, as well as power it on – and even delete it from the catalog.

Note: See how to deploy the vApp at the same time as copying it is deployed in a “fenced mode”. The interesting thing about this is much depends on how the vCloud SP has prepared their environment.
This copy process will show up as “Task” in vCloud Connector – this “task” represents the WHOLE process – copy to another location, deploy and power on – so they do take sometime to reach 100%. I think you will find the “Tasks” node gives you a better over all view of the process.

Copy from vCloud Director:
If a vApp or vApp Template contains multiple VMs, then this results in vSphere vApp being created if they are copied to vSphere. If the vApp contains just one VM then the vApp container disappears – and your left with a single-stand-alone VM. If the copy if from vCloud to vCloud regardless of the number of VMs, it results in a vApp Template being created at the destination.
1. Copying a vApp from vCloud Director (Public) to vCloud Director (Private) is very similar The difference is the vApp is initially transferred to the Private Catalog first, and then onto the Public Catalog.

2. From this point onwards the process it no different from if you cloning a VM from vSphere into vCloud Director. In my case I was taking this from the Stratogen Cloud into my Private Cloud. That result in this configuration for the vApp.

For giggles I decided to do a copy/deploy without the network part seen in step4 of the vSphere copy (which is just like the vCloud copy), which mean what I got was a vApp in da catalog that I could deploy. That changed the wizard because I didn’t get the “(in fence mode)” option. Despite that not being option it still resulted in a Fence vApp. So as far as I can tell – if you copy, deploy from the vCC then Fence mode is mandatory. That could make sense – because a vCC user might not have access to the vCloud Director UI, but more over because it unlikely you would want to take a vApp working in a private cloud, and push it out to the cloud with a whole RE-IP. I imagine you’d want to maintain its IP settings to stop the applications breaking.
Finally. Remember when you add something to your catalog and send it to the public cloud or vice-versa – it can contain some references from the source (where ever that might be). So in my case I took a vApp from the Stratogen Cloud, and copied to my Private Cloud. When I manually deployed it I could see the old network name from the source. So here the reference to “Direct Connection” is coming from the Stratogen Cloud, not from my Private Cloud.

So if you merely copy the vApp into your catalog – and then deploy you can have complete control over the deployment if you use the full vCloud Director UI.

Using Content Sync
Catalogs and their content can be “published” across an entire vCloud instance and made visible to every Organization in that vCloud install. This is available on the right-click of the Catalog and makes the catalog available in every Organization under “Public Catalogs”


In contrast – Content Sync is new feature to vCloud Connector 2.0 and is a classed as an “advanced” feature so it does require a valid vCloud Suite 5.1 licenses. Content Sync acts a library of Templates (either vSphere or vCloud Director) that can be gathered from different catalogs in different clouds – and it goes a long way of addressing the issue that each vCloud instance (at least one for Public and one for Private) has its own catalog whose content is not necessarily shared.
Users subscribe to the content they want and it is reference in the master library called the “Content Library”

Any changes made to items that are subscribed to in the Content Library are synched to local locations whether they be items in the vCloud Director Catalog or a folder of templates in vSphere. If changes are made to the source vApp Template then these are updated in the Content Library (every 6hrs by default after the first initial sync). The system does retain previous copies so it isn’t a versioning system as such that allows you to roll-back to infinity and beyond – if a vApp Template is deleted from the source it doesn’t delete it from the content library – that’s a manual process. I assume the idea behind this is if a catalog author or higher deletes a vApp Template, it doesn’t immediate disappear from everyone use – and so you are protected to some degree from accidental deletes (commonly referred to as “fat finger syndrome”). Published Folders/Catalogs and Subscribing Folders/Catalogs can be seen by their different icons which indicate the direction of traffic – out of the Published Catalog/Folder, and in to the Subscribed Catalog/Folder:
Publish Folder/Catalog: ![]()
Subscribed Folder/Catalog: ![]()
One big recommendation is to create dedicated “Subscribed Folder/Catalog” that are empty, that will be then populated with content sync data – mixing up local content with synch content can be quite confusing. You can also have situations were stuff is over-written because it has the same name. There are tons of other best practises – this is what I’ve cut & pasted from the official admin guide:
- Subscription (destination) folders or catalogs should not contain any content that Content Sync did not create. Specify an empty folder on a vSphere cloud or an empty catalog on a vCloud Director cloud when you set up your subscription and do not add any other content to it after you subscribe. vCloud Connector assumes that subscription folders and catalogs are under its management. If a subscription folder or catalog contains other content, vCloud Connector might overwrite or delete it if naming conflicts occur.
- Do not use the same subscription folder or catalog for multiple subscriptions. For each published folder or catalog to which you subscribe, have a corresponding subscription folder or catalog. If you use the same subscription folder or catalog for multiple subscriptions, vCloud Connector might overwrite or delete templates if naming conflicts occur.
- Nested folders and catalogs are ignored. vCloud Connector does not support publishing or subscribing to a hierarchy of templates. Only the templates at the top-level of a folder or catalog are published to the Content Library.
- Content in a published folder that is not a template is ignored. For example, if the folder you publish contains both templates and virtual machines, only the templates are published to the Content Library.
- A folder or catalog can only be published once. Multiple users should not publish the same folder or catalog to the Content Library.
- Do not publish a subscription folder or catalog (that is, the destination folder or catalog for a subscription) to the Content Library.
- Do not use a published folder or catalog as a subscription folder.
Anyway, less of the chalk ‘n’ talk – let see it in action…..
1. In my case I create a brand new catalog in my private cloud – containing my collection of Damn Small Linux VMs in a vApp I called “Just Enough vApp v1.1″ in a catalog called “CorpHQ Catalog (Public Catalog). I also shared and published within my vCloud Director instance. I called this because all the source of the catalog is “private” it will eventually appear in my “public” cloud location. If I make changes to the catalog in my private cloud, it should be “sync” up to the public cloud. In hindsight perhaps I should have called the catalog “CorpHQ Hybrid Catalog (Source)” and the catalog in the Stratogen Cloud “CorpHQ Hybrid Catalog (Destination).”
2. In vCloud Connector, right-click the catalog and select “Publish to Content Library“

This then creates an entry in the Content Library that others can subscribe too – notice the upward pointing arrow on the catalog:

3. Next someone needs to come along a “Subscribe” to this content. This is done by clicking the “down arrow” when the catalog is selected, and in the wizard setting the “cloud” that will subscribe to that content:

In a short while (because I’m using Damn Small Linux!) the sync process will place the vApp on the Public Cloud catalog as well – notice the downward arrow indicating that this subscriber catalog:

Using Stretch Deploy
Note: Stretched Deploy is GUI driven process when moving a vApp or VM from its source location to its destination. Returning a vApp or VM back to the Public Cloud involves running a script at the vCC Manager console itself.
So far we looked at vCloud Connector from the position of copying and syncing from one “cloud” to another (remember much of vCC features can be extended to vSphere-to-vSphere operations), the Stretch Deploy functionality takes it to whole different level. Allows you to move vApp from your private cloud to the public cloud without any re-IP process. It does this by extending the network configuration out of the private cloud into the public cloud by creating a Layer 2 SSL VPN tunnel between the private network’s vCNS Edge Gateway and the public network’s vCNS Edge Gateway.

IMPORTANT: What Stretch Deploy both handles the VPN and Firewall requirements – it’s all automated for you. So there’s no need to configure a VPN connection to your vCloud Service Provider before hand. HOWEVER, different SP do implement vCloud Director differently – so you may need to work with your SP closely to get the configuration correctly set.
vCloud Connector starts by first verifying the network in the Private Cloud is extendable, it then creates a new routed vApp Network in the Organization in the public cloud – then it creates the NAT/Firewall rules in the Public Cloud (and then in the Private Cloud) – and then it creates an SSL Tunnel from private to public. Once the networking is completed it can then populate the vApp Network with the vApp from the private cloud.
Whether you’re using vSphere or vCloud director a temporary vApp in the Public Cloud to facilitate the setup process – in the case of Private to Public vCloud a temporary vApp is created in both locations – once the setup is complete this temporary VM is deleted. That does mean you need a certain amount of free space to stand-up the stretched vApp – so if you had a 100GB vApp, you’d another 100GB temporary space during the setup process. Of course, once completed this temporary vApp is destroyed. Once the setup is completed any new vApp/VMs get added to this same routed vApp Network in the Public Cloud. You can move a VM within a vApp or entire vApp – what ever you move it must be powered off. I imagine many people will deploy a new VM to a vApp, check that it works properly – and then power of and move to the cloud.
If you doing vCloud to vCloud stretched deploy there are a couple of requirements on the Private Cloud side that must be met these include:
- The vApp must use vApp Network connect to Organization Network which is in turn connected to an External Network – either routed or directly. The only OrgNetwork type not supported is the “Isolated OrgNetwork”. Ahem, which means it not connected to the outside world… that would like try to VPN to server without any network cards… 😉
- You can use DHCP or Static – Manual – but you cannot use “Static IP Pool” allocation type. The static IP pools are like DHCP scopes but they statically configure the guest. Static – Manual allows you assign specific IP address from the Static Pool. So it’s either DHCP or Static – Manual. Static – IP Pool is not supported.


1. This first step is to login into you vCloud Connector manager, and in the “Nodes” tab, select the vCloud Provider you wish to enable “Stretched Deploy” with:
2. In the pop-up box enter you OrgAdmin username and password. The vCC needs OrgAdmin rights in the Public Cloud to deploy the temporary vApp and setup the routed vApp Network.

3. Now repeat this configuration on your private cloud (and if you have it vSphere Cloud). You must enable it on at least one Public and one Private Cloud otherwise the options for “Stretch Deploy” will be dimmed.
Enabling Stretched Deploy to single VM in a vApp
Important: Before you begin, make sure the vApp is powered ON, but the VM within the vApp (that you wish to move) is power OFF.
1. Select the powered off VM in the vApp, and then click the “Stretched Deploy” button or select it in the Actions pull-down menu:

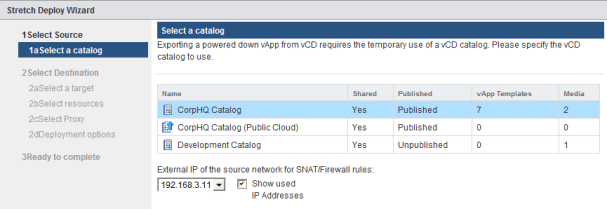
2. Next select a source catalog for the temporary vApp created during the Stretch Deploy process. Then select an IP address that will be used for the outbound VPN connection. In my case I picked 192.168.3.11. This is in use by some DNAT rules by Horizon View PCoIP (TCP:4172) but isn’t used for anything else.
3. Next Select a destination cloud, and set a friendly name for the vApp, and also select a catalog for the temporary vApp created during the Stretched Deploy process.

4. Select a Virtual Datacenter associated with your Organization, together with network. You may need to liaise with your SP to know exactly what settings they require here. In the Stratogen Cloud I found I didn’t have to X Enter a public IP. vCloud Connector discovered my Public IP address when the vApp in the Public Cloud was generated, and automagically enabled it in my Organizations Firewall settings. I think you would find this page would differ considerably from one provider to another.,,

Note: I tried the same settings in the opposite direction – stretching out a vApp in the Stratogen vCloud to my Private Cloud. That case just clicking next here did NOT work. I had to enable the option to “Enter Public IP” and type one of my own public IP address. That’s because fundamentally the way my vCloud Director environment is set up is different.

So in my case I have physical Juniper Firewall where one of my Internet IP address (starts with 83.x.x.x) has been mapped to 192.168.3.12 using ANY:ANY. This affective switches OFF the FW component of the Juniper, and makes my vCNS Edge Gateway the affective firewall for my environment. Mousing over the X Enter Public IP address does a good “in wizard” job of explain the options: “Check this if the OrgVDC network selected above is not accessible from the source directly. Please enter a valid public IP which is reachable from the source network in order to establish the SSL VPN Tunnel.”. That is precisely my situation.
5. Finally, setup whether you are behind a proxy server and if you want to power on the VM in the Public Cloud on completion.
You can watch the progress of the Stretched Deployment from the Taskbar like so:

At the end of the process – you should find there is a Stretched vApp in the Public Cloud with the vApp Network backing it as well:


NOTE: Because of my boot problems with Damn Small Linux (DSL) I switched to using SliTaz instead. So from this point onwards you will see that some of the screen grabs don’t match-up – because I created a “Pretty Small vApp” using three SliTaz virtual machines, rather than my “Damn Small vApp” using DSL. I did validate the above with SliTaz, and found it took just under 5mins to completely stretch deploy my SliTaz on my 1MB/sec up/down link from the colocation. If you’re doing this from a home lab your mileage will vary.
My Experience:
Now the first I tried “Stretch Deploy” I had an amazing experience. It worked first time without a hitch. Yeah, I know a VMware technology that works first time is meant to be out Raison d’être. But I’d be liar if I didn’t admit that sometimes that isn’t the case. I was convinced that I would have missed out some vital pre-requisite due to not RTFM’ing the admin guides properly OR that there would be some sort of firewall issue that would block the communications. But when the VM came up in the Stratogen Cloud I could ping the other nodes in the Private Cloud, and I could also visit the web-page in the Stratogen Cloud as if was local to me. I was so amazed by this I even went as far as opening a console on the VM in the Stratogen Cloud – and use nano to edit the default “index.html” of the web-server – with “Now In the Stratogen Cloud” in order to convince myself I wasn’t seeing some sort cached version of the webpage! I also did this when I got the “Stretch Deploy” working in the opposite direction.

It’s interesting to see what configuration changes were occurred in both cloud during this process. Here’s a quick overview:
a.) The source VM which has been stretched deployed to another cloud is not power-on-able or manageable from the vCloud Connector – if you mouse-over the various buttons you will find that the VM is marked as being stretched deployed, together with a warning that it could create an IP conflict (with the duplicate in the public cloud).


Despite these protection I found I could still go directly to vCloud Director where the original source VM was still located and power it on. I don’t what to make of that. Would you want to keep a ghostly copy of your VM locally…? Perhaps it could be useful as backup if the clone in the cloud was unavailable or went wrong. For example if your bring a VM back home using the script – what if that process failed? Also I’m thinking it might nice if these VMs had a special icon, and when you tried to power it on your got a meaningful warning of the potential dangers. I guess the other alternative is to delete the old VM, especially if the VM in da public cloud is going be changing and evolving.
b.) In the Private Cloud nothing changes on the vApp Network, but the Organization Network is modified. The OrgNetwork’s Firewall is updated to allow the VPN connection to the Public Cloud to be generated. In my case my Stratogen Public Cloud IP starts with 212.x.x.x and port443 outbound is enabled for my vCNS Edge Gateway who external IP is 172.168.5.16 – the internal IP range I used was 192.168.22.x for the vApp Network.

C. A vApp and vApp Network are created in the Public Cloud. This vApp Network has standard settings applied to it. DHCP is not enabled, as the stretched vApp gets its IP address over the VPN connection from the private cloud DHCP service on the vApp Network in the public cloud… There is a firewall rule that allows all traffic out from the stretched vApp – there’s no “inbound” rule, because it’s the Private Cloud’s firewall which controls this – remember for all intents and purposes the stretched vApp believes itself to be on the SAME network as the private vApp because of the VPN connection.

d. The vApp in the Public Cloud is “shared” – in other words permissions are set on it – with the credentials coming from the Public Cloud account that was used to authenticate to the vCloud Connector in the vSphere Client.

Bringing It All Back Home (Bob Dylan Reference)
You can bring a VM/vApp “home” by running a script on the vCC Node itself. You have to navigate to a directory – extract tar file, then set execute permissions on the scripts before they can be executed.
1. Login into the vCloud Connector NODE (not the manager – the username is admin, default password if you haven’t reset it yet is vmware)
Note: You might perfer to use SSH rather than a remote console session. To start sshd type actually type /etc/init.d/sshd start
2. Navigate to cd /opt/vmware/hcagent/scripts
3. Extract the reverseStretchDeploy.tar file with:
sudo tar -xvf reverseStretchDeploy.tar

4. Set the chmod rights so you can execute the scripts: sudo chmod -R 777 ../scripts
5. Moving to the director where the reseverseStretchDeploy.sh script is located
cd bin
6. Run the script with ./reseverseStretchDeploy.sh
7. The script requires a LOT of parameters, and is difficult to complete without an error. You might find cut and pasting the variables from vCloud Director, into the script. Additionally, the parameters are case-sensitive as well. If you click at the image you will see the sort of variable needed.

Conclusion:
All in all was impressed by the vCC and the tools it offers. Next steps I can see is improving the interface for taking back the stretched VM from Public Cloud. I guess what some people might like to see is the ability to deploy to foreign cloud providers, but that would require some sort of conversion tool from one virtual disk format to another…